ESP8266/collegamentoarduino
Jump to navigation
Jump to search
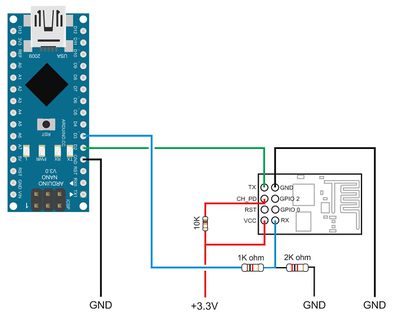
Siccome le uscite di Arduino sono a 5V, bisogna utilizzare un partitore di tensione per abbassare la tensione sulla TX da Arduino che va alla RX del ESP8266
Sketch
 // Basic serial communication with ESP8266
 // Uses serial monitor for communication with ESP8266
 //
 //  Pins
 //  Arduino pin 2 (RX) to ESP8266 TX
 //  Arduino pin 3 to voltage divider then to ESP8266 RX
 //  Connect GND from the Arduiono to GND on the ESP8266
 //  Pull ESP8266 CH_PD HIGH
 //
 // When a command is entered in to the serial monitor on the computer
 // the Arduino will relay it to the ESP8266
 //
 #include <SoftwareSerial.h>
 SoftwareSerial ESPserial(2, 3); // RX | TX
 void setup()
 {
     pinMode(LEDPIN, OUTPUT);
     Serial.begin(9600);     // communication with the host computer
     //while (!Serial)   { ; }
     // Start the software serial for communication with the ESP8266
     ESPserial.begin(9600);
     Serial.println("");
     Serial.println("Remember to to set Both NL & CR in the serial monitor.");
     Serial.println("Ready");
     Serial.println("");
 }
 void loop()
 {
     // listen for communication from the ESP8266 and then write it to the serial monitor
     if ( ESPserial.available() )   {  Serial.write( ESPserial.read() );  }
     // listen for user input and send it to the ESP8266
     if ( Serial.available() )       {  ESPserial.write( Serial.read() );  }
 }
cambiare la velocità del seriale in base al firmware del ESP8266
ESP-LINK
Assolutamente consigliato il firmware esp-link per chi voglia connettersi ad Arduino via telnet via wifi.
Non ancora testato ma altrettanto interessante la possibilità di caricare gli skecth via wifi.
Ci sono anche altre funzioni interessanti ad esempio la possibilità di inviare il syslog ad un nodo di raccolta dei log, una console web, ntp.
Attenzione, pare non funzionare su ESP-01 ed ESP-03 (testato su ESP-12 funziona).
