JeeNode
JeeNode, manufactured by JeeLabs is an Arduino-compatible board; it's quite small and comes with a radio module which can be used to easily create a network of wireless devices.
Programming
Being based on the same Atmel chip, it's seen as an Arduino UNO and the usual Arduino IDE can be used to write and upload the sketches (the micro version uses a different chip, and requires a little more work to program).
Programming interfaces
Some versions have a FTDI interface, so you may also need an USB-BUB adapter (but I guess it can also be programmed using another Arduino, for example). Mine has an USB port on it, so it's not a problem.
A very simple example: the unexpectedly blinking LED
As a very basic example, we'll setup two nodes; one will send a byte every second and the other will read it and turn off an LED if 0 was received, and turn it on otherwise.
Set the nodes' IDs
The first thing to do, is to set the node IDs: each node must have a unique ID (in the 1..31 range; 0 is reserved for broadcasting) to be able to communicate with other nodes. The best way to do it is probably using the RF12demo sketch; once you've uploaded it to your node, you can open the serial port of the Arduino IDE to send commands to it; set the two nodes to different IDs.
Another option, is to replace the rf12_config call in the code with something like rf12_initialize(ID, RF12_868MHZ, 212) (to set it to id ID, on 868Mhz band, group 212).
Remember that only the devices in the same group can talk to each other (valid values are from 1 to 212).
Hardware
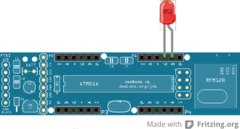
The hardware cannot get any simpler than wiring an LED to the digital and ground pins of the first port (respectively marked with D and G).
Software
The JeeLib gives you access to the wireless module, I/O ports and so on.
Let see the code for the two nodes.
Code for the sender
/*
 * JeeNode Wireless Blinking LED - Sender.
 *
 * A very basic example of how to set an LED status (turning it
 * on and off) based on the value received from another JeeNode.
 *
 * Copyright (c) 2013 Davide Alberani <da@erlug.linux.it>
 *
 * It's assumed that you've already set the nodes IDs following
 * the guide in http://jeelabs.net/projects/cafe/wiki/POF_03_-_Wireless_light_sensor
 * This example is absolutely NOT optimized, and will consume a lot
 * of power unnecessarily; in the same page, you can find many improvements.
 *
 * This program is free software: you can redistribute it and/or modify
 * it under the terms of the GNU General Public License as published by
 * the Free Software Foundation, either version 3 of the License, or
 * (at your option) any later version.
 *
 * This program is distributed in the hope that it will be useful,
 * but WITHOUT ANY WARRANTY; without even the implied warranty of
 * MERCHANTABILITY or FITNESS FOR A PARTICULAR PURPOSE.  See the
 * GNU General Public License for more details.
 *
 * You should have received a copy of the GNU General Public License
 * along with this program.  If not, see <http://www.gnu.org/licenses/>.
 */

#include <RF12.h>

int led_status = 0;


void setup () {
    // initialize the serial port and the RF12 driver
    Serial.begin(9600);
    rf12_config();
    rf12_easyInit(0);
}


void loop() {
  // keep the easy transmission mode going
  rf12_easyPoll();
  // send the data
  rf12_easySend(&led_status, sizeof led_status);
  // change the status
  led_status = !led_status;
  delay(1000);
}
Code for the receiver
/*
 * JeeNode Wireless Blinking LED - Receiver.
 *
 * A very basic example of how to set an LED status (turning it
 * on and off) based on the value received from another JeeNode.
 *
 * Copyright (c) 2013 Davide Alberani <da@erlug.linux.it>
 *
 * It's assumed that you've already set the nodes IDs following
 * the guide in http://jeelabs.net/projects/cafe/wiki/POF_03_-_Wireless_light_sensor
 * This example is absolutely NOT optimized, and will consume a lot
 * of power unnecessarily; in the same page, you can find many improvements.
 *
 * This program is free software: you can redistribute it and/or modify
 * it under the terms of the GNU General Public License as published by
 * the Free Software Foundation, either version 3 of the License, or
 * (at your option) any later version.
 *
 * This program is distributed in the hope that it will be useful,
 * but WITHOUT ANY WARRANTY; without even the implied warranty of
 * MERCHANTABILITY or FITNESS FOR A PARTICULAR PURPOSE.  See the
 * GNU General Public License for more details.
 *
 * You should have received a copy of the GNU General Public License
 * along with this program.  If not, see <http://www.gnu.org/licenses/>.
 */

#include <JeeLib.h>

Port led (1);

int led_status = 0;


void setup () {
    // initialize the serial port and the RF12 driver
    Serial.begin(9600);
    rf12_config();
    // set up easy transmissions
    rf12_easyInit(5);
    // set LED port to output
    led.mode(OUTPUT);
}


void loop() {
  // check if something has been received and if it's correct.
  if (!rf12_recvDone()) {
    return;
  }
  if (rf12_crc) {
    Serial.println("CRC ERROR");
    return;
  }
  if (rf12_len != sizeof led_status) {
    Serial.println("WRONG DATA SIZE");
    return;
  }
  // copy the data in another memory location
  memcpy(&led_status, (int*) rf12_data, sizeof led_status);
  // turn on or off the LED, accordingly to the received value
  led.digiWrite(led_status);
}
Improvements
As said, this code is very power-hungry and way too simple for a real-case use, but should be enough to get you started.

