Raspberry PI: network boot explained
The network booting process has three phases:
- get an IP address via DHCP
- load kernel and configuration files using TFTP
- mount root partition by NFS
This example-tutorial uses a Raspberry PI as a boot client and a Debian server (maybe another Raspberry PI running Raspian). The tool needed on the server are dnsmasq and nfs-kernel-server. The packets can be loaded in this way:
# apt-get install dnsmasq nfs-kernel-server
Any Raspberry PI can be net-booted
...but it needs an SD card. Only Raspberry PI 3 supports network booting without any card (although I have not tested it yet).
The SD card need to contain one FAT partition and inside it one file: bootcode.bin. The latest version of bootcode.bin can be dowloaded from here. It is a 50K file so any size of SD Card is okay. Even a partially damaged SD card or a fake SD card can be used for this purpose. This file will be read at boot time and never modified so the card should not be further damaged.
Further information on the boot modes can be retrieved from the boot modes page on the raspberry pi foundation documentation site.
Phase 1: DHCP
The goal of DHCP is to provide our Raspberry PI with an IP address and inform it that the server is available for the next steps of the network boot
The Raspberry PI MAC address is required to provide it with its specific IP address.
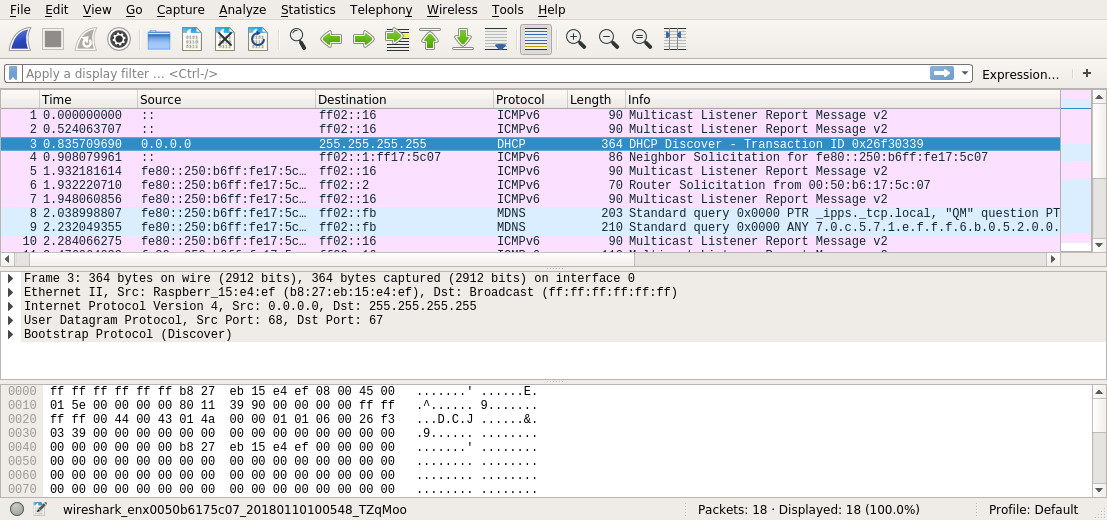
I suggest to use wireshark (clearly on the server) to get this information: a view on the network packets flowing on the net can teach a lot about how the boot process really works.
Start wireshark, put the SD Card in the Raspberry PI, connect the Raspberry PI to the network, and power it on.
The screenshot shows the DHCP request. The MAC address of my Raspberry PI is: be:27:eb:15:e4:ef
The next step is to configure a DHCP server to provide the Raspberry PI with its own IP address.
In this test I'll use DNSmasq.
This is the configuration to assign the IP address 192.168.1.100 to the MAC be:27:eb:15:e4:ef on the interface eth0.
interface=enx0050b6175c07
bind-interfaces
dhcp-range=192.168.1.100,192.168.1.100,255.255.255.0,1h
dhcp-host=be:27:eb:15:e4:ef,192.168.1.100,1h
pxe-service=0,"Raspberry Pi Boot"
log-dhcp
The option pxe-service notifies the Raspberry pi that this server supports the net boot.
Restart dnsmaq:
sudo systemctl restart dnsmasq.service
restart wireshark and powercycle the Raspberry PI.
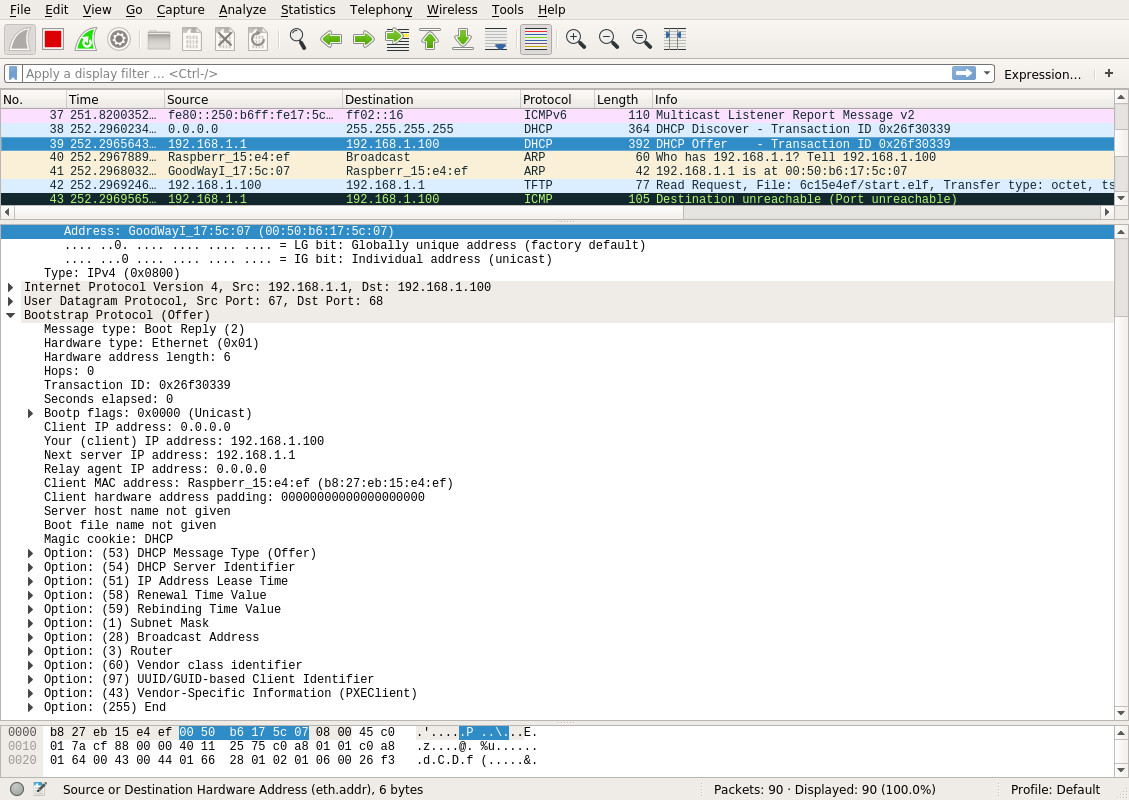
If everything is working properly now the Raspberry PI receives a DHCP offer and tries to continue with the following step (and it fails as we have not configured TFTP, yet).
Here is the screenshot:
Packet #39 is the DHCP reply whish assigns the address to the Raspberry PI, then packet #42 tries to load the file "6c15e4ef/start.elf" via TFTP...
We are ready for the second phase.
Phase 2: TFTP
TFTP means trivial file transfer protocol. Nothing really complex can be used at boot time, the code to manage TFTP at boot time needs to fit in the BIOS ROM or, in our case, in the 50K bootcode.bin file.
DNSmasq is able to provide TFTP too.
Let us enable TFTP: it is possible just by add two lines in /etc/dnsmasq.conf:
enable-tftp
tftp-root=/tftpboot
The tftp-root parameter defines the root directory for tftp: any file inside this directory (and in its subdirectories) will be available for downloading via TFTP. Feel free to put it where it is more suitable in your file system.
The files needed to boot a Raspberry PI can be stored in the TFTP root directory or in directories named upon the Raspberry PI serial number/MAC address. In the former case the files will be shared between all the raspberry pis using the net-boot service on the same server, the latter choice permits to define specific boot files for each client.
From the wireshark trace above it is possible to read that the specific directory for my RPI is "6c15e4ef".
The files needed to boot a raspberry PI are those available in the boot partition of a standard disk image.
It is possible to write an image on an SD card and then copy all the contents of the first partition (FAT). The following commands show how to take the files directly from a disk image, in the example from 2017-11-29-raspbian-stretch-lite.img (the latest image can be downloaded for here).
sudo losetup -f --show -P 2017-11-29-raspbian-stretch-lite.img
sudo mount -o ro /dev/loop0p1 /mnt
sudo mkdir -p /tftpboot/6c15e4ef
sudo cp -a /mnt/* /tftpboot/6c15e4ef
sudo umount /mnt
sudo losetup -d /dev/loop0
The first command (losetup) creates a loopback to mount a partition of a disk image. The second command mounts the first partition in read-ony mode as /mnt. Then mkdir creates the directory in the tftp root, cp copies all the tree from mnt to the newly created directory. The last two commands undo the effects of the first and second.
The cmdline to start the kernel need to be modified in order to mount the root partition via nfs. Here the /tftpboot/6c15e4ef/cmdline file has the following contents:
dwc_otg.lpm_enable=0 console=serial0,115200 console=tty1 root=/dev/nfs nfsroot=192.168.1.1:/srv/nfs/raspianroot,nfsvers=3 rw ip=dhcp rootwait elevator=deadline
The IP address and path of the directory exported as root partition need to be change to suit your environment.
Restart dnsmasq,
sudo systemctl restart dnsmasq.service
and power cycle the raspberry PI client.
If you have a monitor connected to the Raspberry PI now if everything is working properly it boots and.... fails. It should terminate (after a while) with Kernel Panic complying that it is unable to mount the root partition. It is correct as the third phase is still missing.
Phase 3: NFS
Network File System service must be configured to provide the root partition to our Raspberry PI.
First of all

