Differenze tra le versioni di "Some experiments on Radio Remote Controls"
| Riga 186: | Riga 186: | ||
#define LONGDELAY 590 | #define LONGDELAY 590 | ||
#define NTIMES 12 | #define NTIMES 12 | ||
| + | #define NTIMESBF 6 | ||
unsigned int timings[MAX_CHANGES]; | unsigned int timings[MAX_CHANGES]; | ||
unsigned int changeCount; | unsigned int changeCount; | ||
| + | unsigned int verbose=0; | ||
| + | unsigned int bfvalue=0; | ||
unsigned char val(unsigned int timing) { | unsigned char val(unsigned int timing) { | ||
| Riga 208: | Riga 211: | ||
return 0; | return 0; | ||
} | } | ||
| − | Serial.print("MM53200 code: "); | + | if (verbose) Serial.print("MM53200 code: "); |
for (i=0; i<12; i++) | for (i=0; i<12; i++) | ||
Serial.print(code[i]); | Serial.print(code[i]); | ||
| Riga 219: | Riga 222: | ||
static unsigned int repeatCount; | static unsigned int repeatCount; | ||
| − | + | long time = micros(); | |
duration=time-lastTime; | duration=time-lastTime; | ||
if (duration > 5000 && duration > timings[0] - 200 && duration < timings[0] + 200) { | if (duration > 5000 && duration > timings[0] - 200 && duration < timings[0] + 200) { | ||
| Riga 227: | Riga 230: | ||
if (repeatCount == 2) { | if (repeatCount == 2) { | ||
decodeMM53200(); | decodeMM53200(); | ||
| + | #if 0 | ||
| + | for (i=0; i<changeCount; i++) { | ||
| + | Serial.print(timings[i]); | ||
| + | Serial.print(" "); | ||
| + | } | ||
| + | Serial.println(); | ||
| + | #endif | ||
repeatCount = 0; | repeatCount = 0; | ||
} | } | ||
| Riga 263: | Riga 273: | ||
} | } | ||
| − | void sendcode(int value) { | + | void sendcode(int value, int times) { |
| − | int i= | + | int i=times; |
| − | Serial.println(value, BIN); | + | if (verbose) Serial.println(value, BIN); |
while (i--) | while (i--) | ||
sendMM53200(value); | sendMM53200(value); | ||
| Riga 271: | Riga 281: | ||
void bruteforce(void) { | void bruteforce(void) { | ||
| − | + | for (; bfvalue<4096; bfvalue++) { | |
| − | for ( | + | if (Serial.available()) break; |
| − | sendcode( | + | sendcode(bfvalue,NTIMESBF); |
| + | } | ||
| + | bfvalue &= 0x3ff; | ||
} | } | ||
void inbyte(int inchar) { | void inbyte(int inchar) { | ||
| − | static value = 0; | + | static int value = 0; |
switch (inchar) { | switch (inchar) { | ||
case '\r': | case '\r': | ||
| − | sendcode(value); | + | sendcode(value,NTIMES); |
value=0; | value=0; | ||
break; | break; | ||
case 0x02: | case 0x02: | ||
| + | bfvalue=value; | ||
| + | case 0x03: | ||
bruteforce(); | bruteforce(); | ||
| + | break; | ||
| + | case 0x16: | ||
| + | verbose = 1 - verbose; | ||
| + | if (verbose) | ||
| + | Serial.println("verbose"); | ||
break; | break; | ||
case '1': | case '1': | ||
| − | value+ | + | value = (value<<1) + 1; |
| + | break; | ||
case '0': | case '0': | ||
value <<= 1; | value <<= 1; | ||
| Riga 307: | Riga 327: | ||
} | } | ||
</source> | </source> | ||
| + | |||
| + | A user (or a deamon) can interact with the sketch using a terminal connection. | ||
| + | <pre> | ||
| + | screen /dev/ttyUSB0 115200 | ||
| + | </pre> | ||
| + | |||
| + | When a signal of a remote control using MM53200 encoding is received its code appears on the terminal. | ||
| + | To send a code, just type in a 12 bit binary number (no echo) followed by CR, | ||
| + | ctrl-v turns on and off the "verbose mode": it prints some more log messages. | ||
| + | ctrl-b starts a brute force scan of the codes. If you type a code followed by ctrl-b the scan starts from | ||
| + | that code, otherwise from zero. | ||
| + | A scan can be stopped by typing any key (e.g. space) and can be restarted typing ctrl-c. | ||
| + | |||
| + | It is possible to use the sketch on other frequencies, e.g. 315Mhz or 330Mhz, using the RX TX modules for the | ||
| + | required frequencies. | ||
| + | |||
| + | '''Please note that a misuse of the code above can be considered to be a crime. Technical ability and legal possibility are | ||
| + | independent concepts (otherwise nobody would be allowed to sell knives)''' | ||
== Raspberry PI TX for mm53200 == | == Raspberry PI TX for mm53200 == | ||
== Raspberry PI TX for avidsen sockets == | == Raspberry PI TX for avidsen sockets == | ||
Versione delle 17:29, 4 giu 2016
Arduino and Radio Controller Sockets
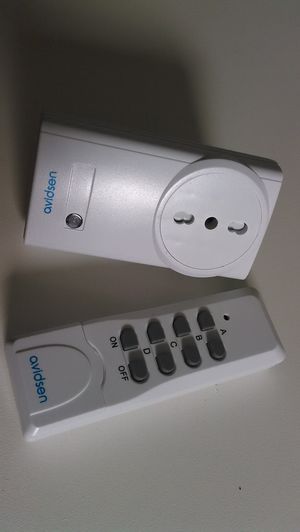
I have bought a kit by avidsen including a socket and a remote.
My goal was twice. I wanted to control avidsen sockets using an arduino and to get commands from a avidsen remote.
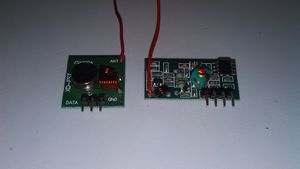
For that I have taken a set of RX and TX 433.92Mhz modules. This kind of modules are very common on e-bay.
They are usually provided without an antenna: they need a 17.3 cm wire soldered to the ANT labelled terminal.
There is already a library named RC-Switch. It can be downloaded from github. This is its latest release: https://github.com/sui77/rc-switch/releases/tag/v2.52.
The library includes a set a of examples. I have created a specific sketch for my avidsen set.
The wiring between the Arduino and TX/RX modules is:
TX has three pins
(left to right watching the component side of the PCB, there are clear labels):
   DATA <-> Arduino GPIO 2
   Vcc  <-> Arduino 5v
   GND  <-> Arduino GND

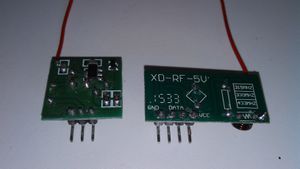
RX has four pins
(left to right watching the component side of the PCB, the labels are printed on the reverse side of the PCB)
   Vcc  <-> Arduino 5v
   DATA <-> Arduino GPIO 10
   DATA <-> (the two DATA pins are connected together, so either can be used).
   GND  <-> Arduino GND
#include <RCSwitch.h>

RCSwitch mySwitch = RCSwitch();

#define BINARY 0
#define SWITCH 1
int mode=SWITCH;

void setup() {
  Serial.begin(115200);
  mySwitch.enableReceive(0);  // Receiver on inerrupt 0 => that is pin #2
  mySwitch.enableTransmit(10);
}

void incodeProcess(unsigned long code) {
	static char outbuf[25];
	int i;
	switch (mode) {
		case BINARY:
			for (i=0; i<24; i++, code>>=1)
				outbuf[23-i] = (code & 1) ? '1' : '0';
			break;
		case SWITCH:
			outbuf[5]=outbuf[11]=' ';
			outbuf[13]=0;
			switch (code & 0xF) {
				case 0x1: outbuf[12]='1';break;
				case 0x4: outbuf[12]='0';break;
				default: return;
			}
			code>>=4;
			for (i=0; i<5; i++, code>>=2)
				outbuf[10-i] = (code & 1) ? '0' : '1';
			for (i=0; i<5; i++, code>>=2)
				outbuf[4-i] = (code & 1) ? '0' : '1';
			break;
	}
	Serial.print(outbuf);
	Serial.println();
}

void inlineProcess(char *line) {
	if (line[5] == ' ' && line[11] == ' ' && line[13] == 0) {
		line[5] = line[11] = 0;
		switch (line[12]) {
			case '1':
				mySwitch.switchOn(line,line+6);
				break;
			case '0':
				mySwitch.switchOff(line,line+6);
				break;
			default:
				return;
		}
	} else
		mySwitch.send(line);
}

void inbyte(int inchar) {
	static char inbuf[64];
	static int pos=0;
	if (inchar == '\r' || pos == 64) {
		inbuf[pos]=0;
		inlineProcess(inbuf);
		pos=0;
	} else if (inchar < ' ') {
		switch (inchar) {
			case 0x2: //ctrl-b
				mode=BINARY;
				break;
			case 0x17: //ctrl-W
				mode=SWITCH;
				break;
		}
	} else
		inbuf[pos++]=inchar;
}

void loop() {
  if (mySwitch.available()) {
		incodeProcess(mySwitch.getReceivedValue());
		mySwitch.resetAvailable();
	}
	while (Serial.available()) {
		inbyte(Serial.read());
	}
}
When the sketch has been compiled and loaded it is possible to interact with it using the "Serial Monitor" of the Arduino IDE or a terminal emulator. (my favuorite is screen). Set it to 115200 baud, end of line=CR.
The command for screen is simply
screen /dev/ttyUSB0 115200
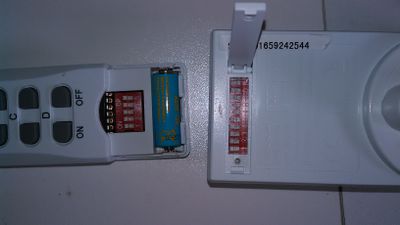
I have set up the dip switches of the remote to the system code '11111' and the socket to system code '11111', unit code '00010' (it is operated by the D buttons of the remote)
Now when I push a button of the remote I get a line like the following:
11111 10000 1
11111 10000 0
11111 01000 1
11111 01000 0
11111 00100 1
11111 00100 0
11111 00010 1
11111 00010 0
The first group of 5 bits is the code of the remote (it is the configuration of the 5 switches hidden in the battery compartment of the remote. The second group is the letter A=10000, B=01000, C=00100, D=00010 (maybe other remotes have a fifth button). The final bit is ON (1) or OFF (1).
So I can use the remote to activate any process, just by checking the pattern received.
viceversa if I type in the code of my socket in the terminal emulator followed by 1 or 0 return (CR) the trasmitter sends the code. Please note that the sketch does not echo what is typed in. When I type:
11111 00010 1
nothing appears on the terminal but the socket gets switched on, and
11111 00010 0
switches it off.
The sketch has been designed to use arduino as a device of a host computer. A daemon could parse the input lines (commands from remote controls) and trigger actions when required by the configuration. The same demon can also write the code of a socket to turn on of off as in the example above. Given this idea of usage, echoing the input would be inconsistent: the demon would receive its own commands, too.
Arduino and mm53200
Using the same modules above and the same wiring I wrote a sketch to open the gate of my garden and to receive the input from a remote control designed for garages and gates.
There is a quite common encoding (at least in Italy): MM53200. It gets its name from the integrated encoder/decoder by National Semiconductor. There are many clones like UM3750, UM86409.
The following sketch can send and receive MM53200 codes (and much more)...
/* (c) 2016 Renzo Davoli */
/* Licensed under the LGPLv2.1+ (inspired by rc-switch-2.52) */
#define MAX_CHANGES 67
#define INPUT_INTERRUPT	0
#define OUTPUT_PIN 10
#define PREAMBLE 10700
#define SHORTDELAY 300
#define LONGDELAY 590
#define NTIMES 12
#define NTIMESBF 6

unsigned int timings[MAX_CHANGES];
unsigned int changeCount;
unsigned int verbose=0;
unsigned int bfvalue=0;

unsigned char val(unsigned int timing) {
  if (timing > 250 && timing < 350)
    return 1;
  else if (timing > 550 && timing < 650)
    return 0;
  else
    return 255;
}

int decodeMM53200() {
  unsigned char code[12];
  int i;
  if (changeCount != 25)
    return 0;
  for (i=0; i<12; i++) {
    if (val(timings[2*i+1]) > 1 || (code[i]=val(timings[2*i+2])) > 1)
      return 0;
  }
  if (verbose) Serial.print("MM53200 code: ");
  for (i=0; i<12; i++)
    Serial.print(code[i]);
  Serial.println();
}

void handleInterrupt() {
  static long lastTime;
  static long duration;
  static unsigned int repeatCount;

	long time = micros();
  duration=time-lastTime;
  if (duration > 5000 && duration > timings[0] - 200 && duration < timings[0] + 200) {
    int i;
    repeatCount++;
    changeCount--;
    if (repeatCount == 2) {
      decodeMM53200();
#if 0
      for (i=0; i<changeCount; i++) {
        Serial.print(timings[i]);
        Serial.print(" ");
      }
      Serial.println();
#endif
      repeatCount = 0;
    }
    changeCount = 0;
  } else if (duration > 5000) {
    changeCount = 0;
  }
  if (changeCount >= MAX_CHANGES) {
    changeCount = 0;
    repeatCount = 0;
  }
  timings[changeCount++] = duration;
  lastTime=time;
}

void sendMM53200(int value) {
	int mask;
	digitalWrite(OUTPUT_PIN,LOW);
	delayMicroseconds(PREAMBLE);
	digitalWrite(OUTPUT_PIN,HIGH);
	delayMicroseconds(SHORTDELAY);
	for (mask=1<<11; mask; mask>>=1) {
		if (value & mask) {
			digitalWrite(OUTPUT_PIN,LOW);
			delayMicroseconds(SHORTDELAY);
			digitalWrite(OUTPUT_PIN,HIGH);
			delayMicroseconds(LONGDELAY);
		} else {
			digitalWrite(OUTPUT_PIN,LOW);
			delayMicroseconds(LONGDELAY);
			digitalWrite(OUTPUT_PIN,HIGH);
			delayMicroseconds(SHORTDELAY);
		}
	}
	digitalWrite(OUTPUT_PIN,LOW);
}

void sendcode(int value, int times) {
	int i=times;
	if (verbose) Serial.println(value, BIN);
	while (i--)
		sendMM53200(value);
}

void bruteforce(void) {
	for (; bfvalue<4096; bfvalue++) {
		if (Serial.available()) break;
		sendcode(bfvalue,NTIMESBF);
	}
	bfvalue &= 0x3ff;
}

void inbyte(int inchar) {
	static int value = 0;
	switch (inchar) {
		case '\r':
			sendcode(value,NTIMES);
			value=0;
			break;
		case 0x02:
			bfvalue=value;
		case 0x03:
			bruteforce();
			break;
		case 0x16:
			verbose = 1 - verbose;
			if (verbose)
				Serial.println("verbose");
			break;
		case '1':
			value = (value<<1) + 1;
			break;
		case '0':
			value <<= 1;
			break;
	}
}

void setup() {
	Serial.begin(115200);
	attachInterrupt(INPUT_INTERRUPT, handleInterrupt, CHANGE);
	pinMode(OUTPUT_PIN, OUTPUT);
	digitalWrite(OUTPUT_PIN,LOW);
}

void loop() {
	while (Serial.available()) {
		inbyte(Serial.read());
	}
}
A user (or a deamon) can interact with the sketch using a terminal connection.
screen /dev/ttyUSB0 115200
When a signal of a remote control using MM53200 encoding is received its code appears on the terminal. To send a code, just type in a 12 bit binary number (no echo) followed by CR, ctrl-v turns on and off the "verbose mode": it prints some more log messages. ctrl-b starts a brute force scan of the codes. If you type a code followed by ctrl-b the scan starts from that code, otherwise from zero. A scan can be stopped by typing any key (e.g. space) and can be restarted typing ctrl-c.
It is possible to use the sketch on other frequencies, e.g. 315Mhz or 330Mhz, using the RX TX modules for the required frequencies.
Please note that a misuse of the code above can be considered to be a crime. Technical ability and legal possibility are independent concepts (otherwise nobody would be allowed to sell knives)


