Chip9$ U-Boot: how to test a new kernel (in a safe way)
... without reflashing the entire disk image...
If you want to boot your C.H.I.P. Debian image using another Linux kernel (not the one provided with the image) and you want to be able to revert to the original kernel if something goes wrong.... this guide is for you.
Set up your backup kernel (a.k.a. plan B or last resort)
Startup C.H.I.P. and login as root then:
# cp /boot/zImage /boot/zImage.orig
Now add in the /boot dir the kernel(s) you want to test. zImage will be the default kernel.
Turn off your C.H.I.P.
# poweroff
You need (UART1) console access!
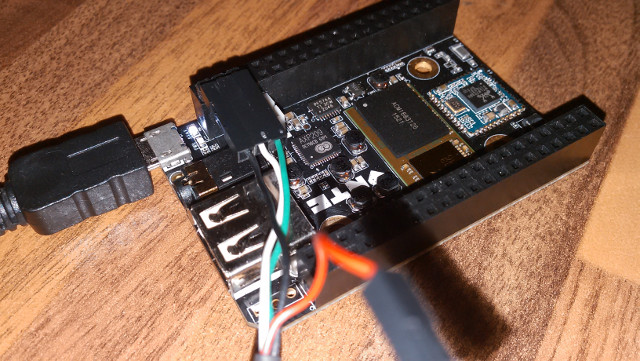
I am using a USB/Serial converter by AdaFruit. The USB/Serial converter must be connected to U14 in this way:
- Ground (black on my Adafruit converter) pin 1
- TX (white) pin 3
- RX (gr een) pin 5
DO NOT CONNECT THE RED CABLE: it is +5v
In this picture I have used a 3 pin male/male 90 degree strip to join the pins from the converter and the U14 socket.
Connect the converter to a USB port of a GNU-Linux box (I am using my Debian/SID Laptop).
As a terminal emulator I use screen (which is a wonderful tool for many usages, a real swiss knife).
screen /dev/ttyUSB0 115200
(obviously on your system it could be ttyUSB1/2 depending on how many other serial on USB device are already connected, a rule-of-thumb method can be to see the output of ls /dev/tty* before and after conencting the converter).
Now boot your C.H.I.P. (connect it to the power supply).
Be Quick! type space!
You'll have three seconds to stop the boot process and have access to the u-boot shell.
Here is what it should appear on your console:
U-Boot SPL 2015.07 (Oct 21 2015 - 20:45:11)
DRAM: 512 MiB
CPU: 1008000000Hz, AXI/AHB/APB: 3/2/2
Card did not respond to voltage select!
Nand initialised


U-Boot 2015.07 (Oct 21 2015 - 20:45:11 +0000) Allwinner Technology

CPU:   Allwinner A13 (SUN5I)
I2C:   ready
DRAM:  512 MiB
NAND:  8192 MiB
MMC:   SUNXI SD/MMC: 0
Setting up a 720x576i composite-pal console (overscan 32x20)
In:    serial
Out:   vga
Err:   vga
Net:   usb_ether
Unknown command 'usb' - try 'help'
Hit any key to stop autoboot:  0
sunxi#
This is the environment variable to change:
sunxi# printenv bootcmd
bootcmd=source ${scriptaddr}; nand slc-mode on; mtdparts; ubi part UBI; ubifsmount ubi0:rootfs; ubifsload $fdt_addr_r /boot/sun5i-r8-chip.dtb; ubifsload $kernel_addr_r /boot/zImage; bootz $kernel_addr_r - $fdt_addr_r
(it is a very long line)
In case you want to boot the system using the backup/plan B/last resort kernel (zImage.orig) change bottcmd as follows:
sunxi# setenv bootcmd 'source ${scriptaddr}; nand slc-mode on; mtdparts; ubi part UBI; ubifsmount ubi0:rootfs; ubifsload $fdt_addr_r /boot/sun5i-r8-chip.dtb; ubifsload $kernel_addr_r /boot/zImage.orig; bootz $kernel_addr_r - $fdt_addr_r'
Now C.H.I.P. will boot using the safe kernel. (you may type in the name of any other kernel in /boot to try some other kernel image).
sunxi# boot
A tiny request for people @ Next Thing Co.
Can you please add a U-boot environment var like:
setenv imagename zImage
and use it in the bootcmd like this:
setenv bootcmd '..... ubifsload $kernel_addr_r /boot/$imagename; ...'
It would be simpler and faster to change the name of the image to boot.
update (2016Feb)
u-boot prompt is now (instead of sunxi#):
=>
There is a convenient command to edit the bootcmd var:
=> editenv bootcmd
This command permits the modification of the variable using the arrow-keys (so it is simple to change the pathname of the kernel to load).
In the standard ChipOS release there is a zImage.bak file which is already a copy of zImage... this can be used as a last resort choice to return to a safe kernel image to boot.
