Differenze tra le versioni di "ESP8266/collegamentoarduino"
Jump to navigation
Jump to search
(Creata pagina con '400px Siccome le uscite di Arduino sono a 5V, bisogna utilizzare un partitore di tensione per abbassare la tensione sulla TX da Arduino che va...') |
(Nessuna differenza)
|
Versione delle 21:40, 27 mag 2015
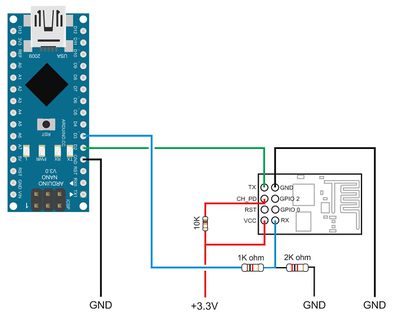
Siccome le uscite di Arduino sono a 5V, bisogna utilizzare un partitore di tensione per abbassare la tensione sulla TX da Arduino che va alla RX del ESP8266
Sketch
 // Basic serial communication with ESP8266
 // Uses serial monitor for communication with ESP8266
 //
 //  Pins
 //  Arduino pin 2 (RX) to ESP8266 TX
 //  Arduino pin 3 to voltage divider then to ESP8266 RX
 //  Connect GND from the Arduiono to GND on the ESP8266
 //  Pull ESP8266 CH_PD HIGH
 //
 // When a command is entered in to the serial monitor on the computer
 // the Arduino will relay it to the ESP8266
 //
 #include <SoftwareSerial.h>
 SoftwareSerial ESPserial(2, 3); // RX | TX
 void setup()
 {
     pinMode(LEDPIN, OUTPUT);
     Serial.begin(9600);     // communication with the host computer
     //while (!Serial)   { ; }
     // Start the software serial for communication with the ESP8266
     ESPserial.begin(9600);
     Serial.println("");
     Serial.println("Remember to to set Both NL & CR in the serial monitor.");
     Serial.println("Ready");
     Serial.println("");
 }
 void loop()
 {
     // listen for communication from the ESP8266 and then write it to the serial monitor
     if ( ESPserial.available() )   {  Serial.write( ESPserial.read() );  }
     // listen for user input and send it to the ESP8266
     if ( Serial.available() )       {  ESPserial.write( Serial.read() );  }
 }
cambiare la velocità del seriale in base al firmware del ESP8266
